Thursday, November 10, 2011

Sprucing up the yard

I have finally planted the Alphonse-Karr bamboos into the ground. They have been growing steadily over Spring and i can't wait for Summer to see them take off! Also installed some ornaments on our brushwood fence, tell me if its nice because we love it :)


Sunday, October 2, 2011

Spring is here!

These are a few of our plants and they have done well to fight off the frosty and very wet winter we had this year. They are mostly succulents and have brightened up, and i just can't wait till they really get going in mid-late spring and summer :) You will also see a picture of baby Alphonse Karr bamboo shoots, we just purchased 3 of these bamboo plants and will update with more pics.


Tuesday, August 2, 2011

Cleaned and oiled deck!

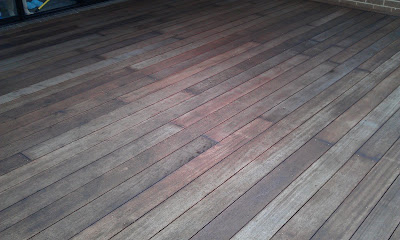
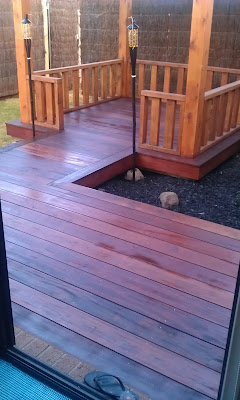
I have finally cleaned and oiled the deck!! The merbau boards were starting to fade after 3 months of rain and shine, so i have taken the opportunity of a day off + beautiful weather (19degrees, sunny blue skies) to get cracking. This is my first attempt at cleaning and oiling a deck and i can tell you our decking area is not small (50m2) and it took me a whole day to clean and put 1 coat of oil. If you don't want to read the lengthy rundown of what i did today, skip to the before and after pictures and tell me how it looks :)

I had to firstly gather all my cleaning gear, which were Napisan, a 10litre bucket, a stiff bristled deck scrubbing brush, some chemical resistant gloves and my garden hose. If you were wondering about the Napisan, that is the chemical we use to clean the deck. It gets rid of all the tannin, oil and dirt on the deck and brings the deck surface back to bare. Alternatively, people also can buy Deck prep or deck cleaning solutions that contain oxalic acid which is stronger than Napisan, and can be used to remove more stubborn stains. I have both but i opted for Napisan as our deck isn't really that dirty, plus i wanted to use a more diluted solution as i did not want to risk killing our newly laid lawn. It is important to wear chemical resistant gloves to protect your hands and goggles would be a good idea too if you have them.

After cleaning, we were meant to leave the deck to dry and people say usually 24 hours but i wasn't going to wait that long! If i waited till tomorrow, the weather could change or the birds could be back in the morning as they always do, and they will crap all over my deck meaning i have to start the cleaning process again. So luckily it was a sunny and windy day meaning a dry day, and it took 2 hours for the deck to dry out enough for me to start oiling. I sped up the drying process by using a cloth to soak up puddles of water, otherwise i can see why it would need 24 hours to dry.

For the oiling process, its a little more complicated. I needed my oil of course which was Cabot's Natural decking oil in Merbau tint ($160.00 for 10litres), a paint mixer/stirer thingy, decent size painting tray, lambswool applicator on a pole, clean shoes or bare foot, paint brush for oiling tight corners and edges, rugs to clean up spills, look up videos on oiling technique, and most importantly plan your steps so you don't box yourself in while oiling! I should have paid more attention to the latter.

The result after 2 hours of oiling without planning my steps properly is a sore back, and un-oiled edges along the brick wall as i boxed myself out! How dumb.. They will have to be oiled tomorrow morning when the deck is dry enough to walk on, along with a 2nd coat of oil for the rest of the deck, if the weather is fine. I can't imagine having to do this all over again in 3 months!!





Thursday, July 14, 2011

Backyard done, no more mud! (updated 01/08/11)

Finally we have covered all the mud. As part of our backyard landscaping, besides the obvious deck, tiki hut, brushwood fencing and gate and lots and lots of filling soil to level the backyard (almost 40m3), we have got the landscapers to lay Kikuyu instant lawn for Zella and also to add some colour. We have also opted for sunset toppings to match our front path laid by the developer, plus a little water feature was custom made and put in next to the hut :D The landscapers also threw in 2 torches as a free gift which sits next to the hut. It gives out a really nice smell when its burning as it uses some plant based oil for fuel.


Wednesday, June 22, 2011

Front yard - complete

The front yard is now complete. The first picture i posted shows the purple recycled water irrigation tubing that is yet to be covered by mulch. All our plants will be fed recycled water via this irrigation system. We think its just lacking in plants but that is all we get from the developer's $2500 rebate. All in all we are pretty happy :)


Saturday, June 18, 2011

Front yard in progress

The developer has started working on the front yard of our house :) Once this is done we will be back working on the rest of the back yard. I think we will very likely be putting in turf/lawn for the rest of the backyard due to budget (costing too much) and time (taking too long). We are quite over the whole muddy backyard thing so by going the "grass" option it seems like the quickest way to get neat, clean ground cover. However we wont be able to walk on it for at least 4 weeks so that the grass beds in. Other downside is that i will have to come up with a couple of hours every week for mowing and green disposal, plus the on going watering and fertilising costs of maintaining a nice lawn. Nice lawn provided Zella (our golden retriever pup) refrains from digging it!

Our original plan was to lay ground toppings like lilydale or sunset toppings, or pebbles and concrete pavers for a more solid flooring without concreting. But now it will seem like the labour cost might blow our budget since we cannot get any machinery (dingos) into our backyard to help with moving soil and toppings. It would have saved us a lot of manual labour costs associated with shovelling and wheelbarrowing, but really we have no other option.


Saturday, May 28, 2011

Moved in! 28-05-2011

The weather has been wet, wet, wet, for the past weeks. It would rain for a few days and then stop for a day before raining again. Its frustrating as the ground needs a few days of sunshine to dry up. Its just muddy all the time and very difficult to work in those conditions. The fencing finally got installed though along with a gate next to the hut. They were short of a few panels so the area around the hot water system is still not complete. You might also notice that the rails for the hut is now complete, the front section was missing previously :)

And if you are wondering why we wanted brush fencing over our existing fencing, its because we wanted the extra height to give us more privacy from our neighbours plus we like the appearance of brushwood. It will give us a good contrasting backdrop when we start putting plants in :)


Saturday, May 21, 2011

Moved in! Day 78 - 21/05/2011

Not much work done since the last time i blogged unfortunately but this is the latest pics anyway :)


Sunday, April 24, 2011

Moved in! Day 50 - 24/04/2011

New photos of our deck + hut from a different angle :) (btw its still not complete)


Thursday, April 21, 2011

Moved in! Day 48 - 22/04/2011


Hosed the deck down today and as you can see the wet look is how it will look like after it gets oiled, just less glossy. I am wetting it daily (except rainy days) so that the tannin in the Merbau bleeds out of the timber. This process is called weathering and i will be doing it for a few weeks although i have found that suggestions vary between 2 weeks to 4 months (but since i have to wait for the deck to be completed anyway its sitting there weathering). This process is followed by some and not by others, but the people for this process says it prepares the timber for oiling much better and gives a better end result as the tannin will have been bled out. While the people against this weathering method say it only allows the timber to dry out and cracks can appear. I am following the majority with our first deck so weathering it is :)

The weathering process will eventually turn the timber grey and dull with all the sticky tannin and dirt stuck on top. This is when we clean it properly with a deck cleaner, along with a good scrub and rinse. Let the timber dry for a day usually, then attack it with the oil you prefer over a day or usually 2 days if you want 3 or more coats as each coat can take 3-6hours to dry. All these will require at least 3 days of good weather and total cost for cleaning and oiling the deck = approx. $400. Time required = couple of hours over 3 days. Repeat this process every 6 months to a year and the deck will look as new for many years to come :)